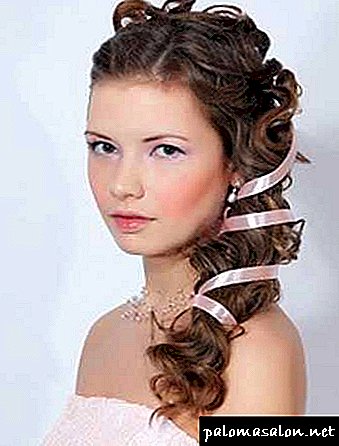
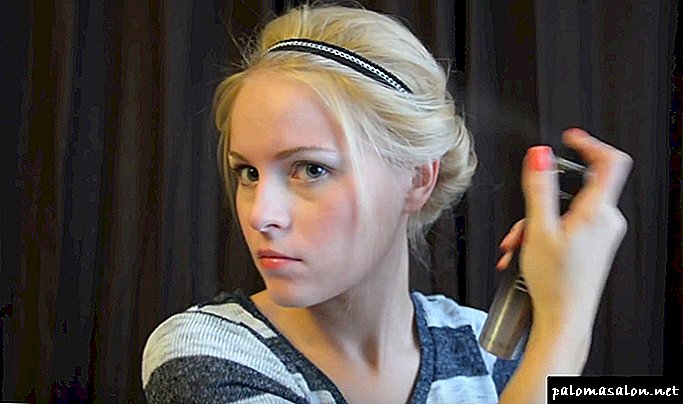
Do you think ribbons are woven into braids only for little girls? You are mistaken! This universal accessory will decorate your everyday or festive hairstyle, will be a bright addition to the image and will liven up even the simplest haircut.

Hairband: how to choose and how to wear?
It is not the first season that the ribbon in hair remains one of the most fashionable and convenient accessories..
Decoration options are many:
- smooth strict dressings for office, casual or home suit,
- velvet, chiffon, silk, decorated with rhinestones or embroidery for evening dresses,
- white, decorated with silver patterns, rhinestones, flowers and pearls, suitable for a wedding,
- fur to wear in winter,
- with ethnic patterns that complement the national costume,
- kapron for children.
Brunettes are better to buy bright bandages, and blondes - dark, as well as blue, lilac or brown.

The main thing is that the decoration does not merge with the hair. For ceremonial events, a bandage is selected to match the clothes.
They wear ribbons on top of their hair, on their foreheads or slightly higher, along the hairline, woven into braids, combined with scarves and handkerchiefs - in short, you only need to give vent to your imagination!
High braided tail with ribbon

Here is a mixture of practicality of a high ponytail with a romantic 4-strand aura of weaving, including ribbon.
- To create this style, instead of the 4th strand, use a satin or lace ribbon (you can take a thread with beads or just a leather cord).
- Attach your accessory at the base of the ponytail and braid the braid.
How to weave a braid from 4 strands see here.
Tail with a creative "rim"

An image for a special occasion or for the case when you have a little extra time to spend on modeling your daughter's hairstyle.
- Spend a horizontal parting parallel to the hairline.
- Divide the selected area into small areas.
- Tie the first and second tails, securing them with a rubber band.
- Divide the hair of the first tail into two parts and combine the ends of these strands not with the adjacent (2nd tail), but with the 3rd.
- Once the woven bezel is full, collect all the hair in the ponytail at the back of the head.
French hair braid flower

Floral hair looks amazing on long blonde hair. This lovely wicker rose is not an exception.
- Divide hair into two parts.
- Braid the upper section into a loose braid and twist it into a flower.
- Stretching the grain spit, turn them into petals of the future flower.
- In the center of the roses, place a decorative hairpin.
- The rest of the hair is woven in the French way.
Twist crown for medium hair

Instead of a traditional French braid, use a twist.
- Do not tuck all the hair, twisting them into the crown.
- Leave some hair for a cute tail on one side, behind the ear.
- Decorate your hairstyle with a pretty bow.
Side tail with double French braid

This image is for experienced weaving craftsmen.
- Divide the hair into two narrow sections along the hairline and braid two thin French braids.
- Working horizontally and down, stop at ear level.
- From the rest of the hair, make a fluffy wavy ponytail on the side.
Festive malvinka with weaving fishtail

Hairstyles for little girls are often filled with all sorts of elements. For example, this Malvinka is charming with delightful ombre curls, fishtail and some lacing of the strands on top.
- First, divide the hair into upper and lower sections.
- The very crown draw a cross-tails, tying them with colorful rubber bands.
- Then tie the loose hair of the upper part and braid the fishtail.
- Leave the hair down, regardless of whether it is straight or curly.
Spit and flagella with bows

Weaving is the most popular method for styling hairstyles for babies with long hair, and adding braids will make them even more fun.
- For this image, divide the hair into three sections: horizontally across the head and the two parts at the back with vertical separation along the center.
- Pull the top of the horse's tail (shifting it sideways), divide it into three strands and twist from each harness, fasten them, and then begin to work on the braids.
- After you finish weaving, attach the harnesses to the braid on the opposite side.
How to weave braids plaits, read here.
Multi Flagella

The ideal modest hairstyle for a little girl to school. In addition, it is very easy to do.
- Gather the hair in a normal horse tail of medium height, divide it into several parts.
- Braid plaits from all strands.
Side tail with a French braid

Here is a quick hairstyle with a braid for those who need to run to the kindergarten in the morning and have time to work.
- Part of the hair in the frontal zone braid French oblique from the temple to the ear.
- Then join the remaining hair and tie the tail behind the ear.
- Add a decorative detail in the form of a bow.
Triple horse tail

Need a fun simple style for active days? There is nothing easier. You do not even need to carry out any partitions.
- Just tie the tails on the side, grabbing the ends of the previous tail under the base of the next.
- Done!
Romantic hairstyle for a little girl in the Greek style

Most of the styles for young children deal with thin and medium texture hair, but what about thick hair? A Greek style hairstyle is easy to create when your child has rich curls.
- All you need to copy a hairstyle is a comb and a ribbon that you need to put around your head.
- Twist the strands around the bandages, tucking them inward and fixing the invisible.
Wicker mat

To create a matting effect, you should upgrade your skills to the next level.
- The hair is separated in the middle.
- On both sides weave unique braids basket weaving (more than three strands).
- Then twisted into small cute bunches.
- The crown of styling is the charming bows of hair, planted over each beam!
Heart double braids

The inner heart was decorated after the outer figure was woven. How to weave braids heart look here. And the ribbon was woven after both hearts were created. Finally, a dark purple flower was attached to each ponytail.
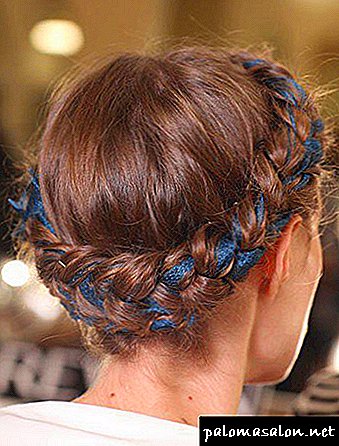
Ribbon braids

This haircut required careful sectioning and artful weaving.
- One French braid is divided into two parts on the crown.
- Cute ribbons and floral decorations make the image perfect for spring or summer.
Do not underestimate the importance of ribbons and hair accessories. They will turn a simple braid into something complex and spectacular.
Hairstyles with ribbons woven into the hair
Unusual mood give styling cute ribbon. This is a stylish accessory, and practical hairdresser accessories, helping to perform complex hairstyles with woven ribbons and able to firmly fix curls.
How unusual are hairstyles with a ribbon in your hair, look at these photos:


There are several types of textiles:
- straight satin strips,
- corrugated bows,
- lace and velvet ribbons,
- monochrome, colorful decorations,
- the strips added with an embroidery, pastes, spangles, artificial or fresh flowers.
Christmas hairstyles with ribbon weaving
The size of the accessories also vary considerably. Very narrow, medium and wide sections resembling a bandage or scarf are used. Hairstyles with weaving ribbons look great not only on little fashionistas. They are very appropriate and in the head of hair of adult ladies, you just need to correctly choose the accessory. Type of hair with a ribbon on the head is determined by the design of the dress. Such styling is considered quite profitable in terms of cash costs. Having bought one tape, you can realize a lot of unique hairdressing ideas.


Hair weaving with decorative ribbons are relevant for many events, including weddings and themed discos.
Girls also love to make fancy New Year hairstyles with ribbon. When choosing materials for hairstyles for the New Year with ribbons are not limited exclusively to any one color of the product. Do not save on additional things - rhinestones, pebbles, bows.
Hair for such hairstyles can be of different structure and length. The process of creating an image does not require much time or special technical preparation. It is not necessary to be a stylist to beautifully decorate the hair. It is quite possible to do hairstyles with ribbons with your own hands, but you will need a sincere desire to achieve results and the ability to confidently manage curls.
Hairstyles with wide blue and red ribbons (with photo)
Textile decorations in the form of ribbons go to almost everyone. However, the personal characteristics of the model are necessarily taken into account. You need to follow certain rules:
- Women with a low forehead are advised to wear a bandage, placing it along the hairline. This will help to visually make the forehead larger. The dressing is placed in the center, if you create a high styling or horse tail.
- Thin stripes set up above the level of the forehead. They fit almost all outfits. They play a predominantly aesthetic role, since, due to their small size, they are not able to reliably fix the magnificent styling. Hairstyle with a wide ribbon looks good on long strands - ribbon placed at the roots of the hair.
- Delicate models of lace in harmony with sundresses and summer dresses, from satin or velvet - with classic clothes. Accessories with rhinestones will complement the evening look, and floral motifs will be relevant on the wedding day.
- You must be attentive to the choice of colors. Blue-eyed brown-haired women go, for example, hairstyles with a blue ribbon. Brunettes should choose products of light shades, and blondes - saturated. This is necessary so that the accessory "is not lost" in the head of hair.
A very good example of a haircut with a red ribbon look at the photo - the model's hair is blond, so the accessory stands out favorably on their background:


Ribbons, interwoven into the hair, should match the style, shade and print along, “overlap” with makeup (the color of shadows, lipstick). Before you buy a tape, determine the desired length. It is better to take a segment with a margin. In this case, it will be possible to tie a luxurious bow, do not limit yourself in styling.
How to make a haircut for a girl with a ribbon on her head: hair styling with step by step photos
Look at the photo for a classic way of creating a Greek hairstyle with ribbons - the whole process is shown step by step:

Strands combed and divided in the center of the parting.

The tape is tied by the type of rim.

Braids are made from the front strands, and they are carefully tucked under the braid.

The rest of the hair is removed under the strip towards the occipital region, evenly distributed.
Hair sprinkled with varnish.
Simple hairstyles with ribbons for medium hair and their photos


Greek simple hairstyles with a ribbon are not the only option that girls with medium-length hair can afford. You can collect shovel in a smooth beam - high or low. Pre-hair is straightened with the help of an iron to make it smooth and silky. Be sure to use special cosmetics that prevent thermal damage to the hair. Then the strands are collected, fixed with studs. At the base of the bundle a fabric strip is tied, the ends of which are hidden inside the babette or they are tied with a bow. Such hairstyles with ribbons for medium hair, made in a minimalist style, are ideal for round-faced girls, because they visually pull out the forms.
Rate nontriviality of hair with a ribbon on medium hair, looking at the photo below:


Hairstyles with ribbons for short hair
Ribbon products will be useful for beauties with haircuts. The most elementary way to perform a hairstyle with a ribbon for short hair is styling “wavy hair”:

hair covered with mousse, evenly distribute the product throughout the hair (make sure that the mousse does not fall on the scalp),

a silk bandage is tied in a wreath or rim style,

With the help of a hair dryer create the effect of "stylish mess."
Strands can be directed up to visually lengthen the neck, or make a bouffant to give additional volume and elegance. You can also slightly curl the strands with a curling iron, spray them with varnish.
Hairstyles with ribbons for long hair (with photos and video)
The greatest number of opportunities is given to owners of long, thick manes. How amazing hairstyles with ribbons for long hair look, look at the photo below:


Stylists call hairstyle “Hollywood waves” one of the brightest and most popular options. Such an original weaving without the help of a ribbon cannot be created. It is usually started from the top of the head, gradually moving along the entire length of the hair to the back of the head and neck. The hairstyle is made up of strands and curls that are intertwined with braid (it is a kind of frame of the entire structure).
Hair is placed either in one isolated stream, or they make two beginnings from two sides, but to the bottom they are still connected into one whole. What is the essence of technology?

Prepare a two-meter satin strip of medium width. The product must be ironed. It is not allowed to use short braid, because the essence of the hairstyle with bows and ribbons is to repeatedly wrap each curl with them.

Tape cling clip on the hair in the area of the crown. It is from here that the weaving will begin.

Allocate the starting strand and twist the braid around it. It is necessary to monitor the tension of the tissue strip. Too weak anchorage is not allowed, otherwise the structure will disintegrate very quickly. But excessive zeal is undesirable, because tight puffs will lead to the fact that microcirculation of blood in the scalp is disturbed.

Take a strand from the side from which the initial pasmo was extracted and also wrap it around with a cloth piece. The number of curls depends on the personal preferences of the girl. Each next strand moves away from the center, curving in a wave and embracing previous curls.

The upper end of the braid at the finish of the weave is fixed inside the hair so that it is not visible.
Such a hairstyle with a red ribbon would be appropriate for a festive event, with pastel shades for everyday life. If you use a decoration with flowers, the idea would be quite appropriate when creating the image of the bride.
Another popular technique is the “shingles - reverse ear”. The essence of this weaving lies in the fact that the extreme strands do not cover the central ones, as in the traditional braid, but inflate under them. Each new step involves the involvement of free hair in the weaving - as you move the ear. Thus, there is a feeling of "floating" braids overhead.
The direction of work is determined on the basis of the aesthetic preferences of the girl. A scythe can begin, for example, from the temporal lobe, pass in a circle and end on the opposite side of the head, behind the auricle. The tape is woven from the very beginning of the procedure. To do this, the pre-ironed strip is folded in half, and the edge on which the bend lies is turned on by the very first curl of the middle curl. In the course of ear extension, they try to locate the string along its central axis or at least as close as possible to it.At the finish tie the ends of the bow tied or tucked, hide in the hair.
To understand the principle of performing a complex hairstyle with ribbons for long hair, watch the video:
Hairstyles for girls with satin ribbons for the New Year and other holidays
Hairstyles with a ribbon in the hair for a girl with long curls, will be an excellent option for a festive event, as well as for everyday look.
The simplest, but very nice way is to braid a shovel into a pigtail. Weaving can be completely anything. Often, for a hairstyle with a ribbon on a girl's medium hair, French braids are made to give hair a voluminousness and weightlessness. They are side, back or circular - it all depends on the length of the baby's hair and the result you want to get.
Even a plain woven ear will harmoniously look with motley ribbon. At its base may be horse's tail. The length of the accessory should be 2.5–3 times the height of the tail. Weave braid start from the base, at the end form a bow.
Make out different hairstyles for girls with ribbons, take a look at the photo:


If the child agrees to calmly behave, then you can make a more complex version of the design of hair - “corset tie”. Such a hairstyle is performed on a girl with long hair with a ribbon, it consists of a pair of braids and intricate lacing between them. As a result, there is the illusion that the braids are interconnected, as elements of a corset.
The following describes this original hairstyle for a girl with ribbons step by step - use the algorithm:

First, the hair is combed over the entire length with a comb or brush. Make a central parting, strictly following the symmetry. Once again comb sections separately.

Begin to weave spikelet as close as possible to the hairline, at the forehead. The bangs remain free or are included in the weaving.

Similar actions are performed on the opposite side of the child’s head. Connect two weaving into one.

When the braids come close to the back of the head, continue the procedure using a fishtail technique or braid an ordinary pigtail from three identical sections. At the end, the common bundle is clamped with an elastic rubber band.

It is permissible to leave curls loose. In this case, they twist with curlers or curling.

Next, proceed to the decor hairstyles with satin ribbon. Most often, girls are woven pink, blue, white or red jewelry. Screed start from the top. To do this, pass the ribbon through the side links of the two weaves. Align it so that the middle is strictly in the center, between the bases of the spikelets.

The next step is to lace up the tape. The free edges of the ribbon are interchanged, crosswise.
A similar manipulation is done to the very end of the braids. It is necessary to observe that the screed touches the links of the braids located against each other.
The work is completed with a bow. The more crosses a tie contains, the more interesting and luxurious it looks.
Hairstyles with braid and ribbon around the head


There is another original version of hair with a scythe and a ribbon. This is a great way to tightly collect long curls of the baby so that they do not interfere with her in the process of games or sports activities. The image does not look boring or strict at all. At first, all the hair is well combed. The child is offered to slightly tilt his head forward. Part of the frame is scratched on the forehead, and in the center of the crown is collected in the tail, which is fixed with an elastic band. Then they begin to weave a circular spikelet, capturing alternately strands of tail and loose hair. Immediately adjust the ribbon, at the end of weaving its free edges are fixed in the form of a bow.
A short-haired crumbs fit hairstyle with a ribbon around the head - the product is tied like a hoop. If you use the accessory with rhinestones or large flowers, then it will be the perfect solution for the matinee or birthday.
Hair is the main decoration of women and girls. To attract attention to them in different ways. Original weaving, decorated with ribbons - a great way to create an extraordinary, memorable image.
Plain braid

The most simple children's hairstyles with interweaving bright ribbons are obtained if:
- to collect hair in a high tail on the crown or on the back of the head,
- take a tape three times the length of the tail,
- tie it at the base of the tail,
- divide it into three equal strands,
- with each of the side strands add one of the ends of the tape,
- start weave ordinary braid,
- without reaching the end of the hair 5-6 cm, tie a bow.
In the same way, we can braid a braid with a cone of two colors, which are tied in one knot and then the knot is fixed on the base of the tail.
Very beautiful hairstyles with ribbons for girls are obtained if you use hairpins.

- hair is divided into a straight parting
- weave two French braids,
- take the tape, put it into the folds of the studs and pass through both braids just below the top of the crown, so that the free ends are of the same length,
- continue to thread the ribbon through the braids so that the weaving is made as on corsets, i.e. crosswise,
- reaching this way to the base of the head, tie a bow.
Five Spin
Also, children's braids can be woven from five strands, two of which are the ends of one ribbon of bright color.
To create such a beautiful hair with ribbons you need:
- split the hair into three parts
- tie the ribbon to the central strand so that its free ends are equal in length (the result is: strand - strand - two tapes - strand).

Weaving carried out according to this scheme:
- first row: the first strand is turned on under the second, then on the third and under the fourth,
- second row: the fifth strand is brought under the first, on the fourth and under the third,
- the third row: the second strand is placed under the fifth, then on the third, under the fourth.
In this order, continue to weave until, until you reach the end of the hair, where the braid is fixed with a silicone rubber band.
The magnificent spit will turn out even more presentable if you take a bright ribbon or elegant braid.
The girl's hair should be gathered in a low tail and tied around its base with a braid. Then they begin to weave the usual three-strand braid, however, instead of side strands, they do not use hair, but the ends of the braid. The end of the braid is fixed with a rubber band, which is hidden under the bow. Pull the strands so that the spit became more voluminous and representative.

Another mischievous and uncomplicated hairstyle, decorated with ribbons, is created as follows:
- divide the hair into a parting
- collect them in two tails on top,
- each tail is braided into a three-strand braid,
- they are wrapped in such a way that they make two “bumps” or “horns”,
- fix the "bumps" studs
- the base is wrapped in bright ribbons and tied in beautiful bows.
“Angel” with a ribbon and “Roll”
Hairstyles with ribbons can be quite simple. For example, if a baby has naturally curly hair, then you can simply wash it, dry it with a hairdryer, comb it with your fingers (not with a comb!). To tie a head with a bright strip of textiles passing through the forehead and tie it in a bow over the ear.

For such a neat styling that will look good on schoolgirls of any age, the hair on the back of the head must first be collected in the tail. Then:
- it should be tied to the tip of the tape or tape so that its free ends were of the same length,
- spread the ends of the braid to the side and start rolling them towards the top of the head so that the tail is curled into a roll with a braid in the middle,
- tie the ends of the braid into a beautiful bow and fix the “bump” for reliability.
“Malvina with pigtails”
This hairstyle can be done if:
- curl the ends of the girl's long or medium hair with forceps,
- take the temporal lock
- fasten or tie a ribbon or braid on it and braid the usual three-strand braid using braid as the middle strand,

- when the spit will be up to the middle of the head, stop weaving and fix this place with an elastic band,
- do the same with the strand at the opposite temple,
- to connect the braids on the back of the head (where there are gum on them),
- tie a bow.
As you can see, there are many options for hairstyles for girls that you can do yourself. So give your fantasy space, be patient and everything will turn out for you!
Easy styling with bows
For the hairstyle you will need:
- 2-3 bows on hairpins,
- 1 gum,
- hairbrush with thick teeth and a fine handle.
Instruction:
- The hair is divided into a straight parting.
- Comb the hair at the temple, braid in a simple braid to the middle of the length of the hair.
- Spit braid on the other side.
- In the area of the nape collect spit and tie together, leaving the ends free.
- To decorate the hair with bows: either only at the temples, or at the temples and at the junction of the braids.
French braid
Even on sparse hair, this braid will look volumetric.
Instruction:
- The strands on the face (in the area of the bang) must be brushed back; this is the central strand of the first binding.
- Take two side strands of the same thickness and make a binding. It is important that the hair below does not fall into it.
- For the next binding take two strands from the sides, adding them to the main.
- Make a binding, add two more strands from the sides.
- Continue until all lateral hair is braided.
- Do the braid in the usual way, or collect the hair in the tail.
Hair "Snake"
The weave of the spit begins from the right temple and is led to the left side. 
Instruction:
- It is necessary to brush off a thin strand and weave a French braid, capturing only the locks on the face.
- When the spit reaches the ear, you need to turn it the other way and weave it until the spit reaches the right edge again. The number of turns depends on the thickness and length of the hair.
- The tip of the braid must be secured with a rubber band or wrap it in a ring and tuck with pins.
The thinner the braid, the more interesting the hairstyle looks.
"Fish tail"
This hairstyle requires attention and accuracy. 
Instruction:
- Hair should be combed with a frequent comb and slightly moistened.
- Comb back, leaving free thin strands at the temples.
- Raise them and cross over on top.
- Holding the strands with one hand, with the other, separate the next side strand, cross with the previous strand so that the bottom is on top.
- Take the next strand on the other side and reintroduce it into the braid so that it is on top.
- Continue until all hair is braided.
A properly braided braid consists of a set of thin, flat strands and resembles fish fins.
Pigtail Bezel
Beautiful and easy hairstyles for girls on medium hair do not require much time. Weave a bezel of pigtails in 10 minutes.
 The braid of braids is one of the most beautiful and light hairstyles for girls with medium hair.
It is done like this:
- It is necessary to comb a thin strand of hair growing behind the ear.
- Braid them with a simple braid.
- Similarly, separate and braid the hair on the other side.
- Throw a braid from the left side to the right, and from the right side - to the left.
- Secure them invisible.
- The remaining hair is slightly curled and combed, adding volume to it.
- At will to decorate the bezel with a bright hairpin.
Neat harnesses
Weave like this:
- To roll neat harnesses, you need to brush the hair from the forehead to the back of the head.
- Split into 3-8 equal strands according to the number of future harnesses.
- Secure the strands with hairpins so that the hair is not tangled, and take the most extreme.
- Divide into two equal parts and begin to weave from the forehead.
- Cross strands, slightly pulling, and weave a braid like a French braid, adding thin strands of side hair before each binding.
- When the harness reaches the parting on the back of the head - fasten it and braid the rest of the harness.
- Leave the remaining hair loose or collect in a low tail.
Bulk harnesses
Bulk harness is woven in the same way as neat, but you do not need to stretch the strands. Weaving should be free. When the harness is ready, you need to pry the strands one by one with your fingers or the hand of a comb and slightly pull it to the side. Act carefully and slowly, so that the width of the bindings is the same.
Hair "Snail"
"Snail" is called two different hairstyles: braid, braided in a circle and a strict bundle, wrapped in the shape of a snail shell.
For the first version of the hairstyle you will need:
- comb with a fine handle,
- elastic,
- 5-6 clips.
Weaving starts from the top. 
Instruction:
- Separate her central strand, the remaining hair to pick up clips.
- Start weaving a braid in a circle, gradually removing the clamps and braiding the hair. This is the first turn of the shell.
- When he is ready, you need to continue weaving in a circle, gradually picking up new strands. While weaving the master must move around the model so that the weaving is neat and symmetrical. Need to finish weaving near the ear.
- When the last free strand remains, it is necessary to weave a braid from it and thread it between the turns of the "snail".
The second version of the hairstyle is done in 2 minutes:
- Hair to collect on a nape in a tail.
- Comb it, and firmly hold in your hand.
- To wind the tips on the handle of the comb and slowly twirl the hair, forming a roller.
- Press the roller to the head with one hand and carefully pull out the comb.
- Pin up the "snail" invisible. You need at least 3 hairpins at the bottom and top, so that the hairstyle does not fall apart.
Rose from hair
This beautiful hairstyle is simple in execution.
For it will need:
 Instruction:
- Hair collected in the tail at the back of the head, secure tight elastic.
- Comb a thin strand on top of the tail and begin to form the middle of the rose: gently wind the strand around in a circle, fixing each new twist with barrettes.
- The rest of the hair to pick up clips so that they do not interfere with weaving.
- Tuck the tip of the first strand and also pin a hairpin. The next strand is the first petal.
- It is necessary to fix it at the base of the tail, pull off the hair so that a rounded inversion turns out and fix it with another hairpin.
- Tip reel around the tail.
- Continue shaping the petals until all the hair has been woven.
- Sprinkle hair with lacquer.
Openwork beam
For openwork hair tie a tail at the back of the head. 
Instruction:
- Divide it into 4-5 strands and braid them into simple loose braids. To fasten.
- Strands of each braid slightly stretch out, making them laced.
- Each braid must be pulled for the longest strands down with one hand, and the other to push up the gum. It should make an openwork flower with a tail in the middle.
- Do the same with the other braids. Get a voluminous open beam.
- Tails need to tuck inward so that they do not stick out of the beam.
Three strand braid
The easiest hairstyle that is easy to do yourself.
- Divide the entire volume of hair into three equal parts.
- Wrap the middle strand and tie. Hide short tip in hair.
- Put the left strand on the middle, hold it under the ribbon.
- Overlay the right strand over the middle.
- Thread the tape under the curl that is in the center. It must pass between the middle and the rightmost strand.
- Repeat steps 3-5 until you have braided the braid to the desired length.
- Secure the end with an inconspicuous rubber band. You can decorate the end with a ribbon bow of a similar color.
- You can make a pigtail tracery, slightly pulling the strands during weaving.
- Lightly fix the hair with lacquer.


Greek Style Hair
Equally popular are Greek hairstyles with a ribbon around the head. Special gum bands are currently being sold to create hairstyles in the Greek style. But you can do it with tape. This is especially true if you need a bandage of a particular shade. For convenience, sew a small rubber band to the ends of the ribbon. It will stretch, and hiding hair under will not be much more convenient. In terms of functionality, such a tape will not yield anything to ready-made accessories.

Greek women by nature have curly, tough hair. Therefore, before creating a hairstyle curl curls on large curlers. So the hair will look more natural, and embossed strands will make the image tender and touching.

Curls will contribute to the additional volume at the crown. If it seems inadequate, make easy bouffant.

- Stir hair at the roots.
- Tie the hair with a ribbon.
- Pass the side strands under it to the left and right.
- Gather the remaining hair together and tuck in the back under the ribbon. Hairstyle is ready.


There is another option with alternate threading of individual strands under the tape.
- Thread under the gum from just one edge. Mix the loose ends of the hair with the rest of the curls.
- Separate the next strand next to it, and slide it under the gum like the first one. For convenience, you can slightly twist the strands flagella.
- Continue similarly on all hair. The result should be smooth rings around the ribbon, and a loose strand of hair on the opposite side.
- These free hair can be removed under the ribbon, you can screw it up and leave it to fall curls, you can braid an interesting openwork braid. Choose the option that best fits the image.
- You can also weave a ribbon of a similar shade into the braid. How to do it - see above.
Video on the topic of the article:
We select correctly
Currently on sale there is a large assortment of various tapes. In order not to get lost when choosing this accessory, try to adhere to the following rules:
- Satin - use in combination with classic dresses and blouses.
- Laced - more suitable for light romantic summer dresses or under the dress of the bride.
- An accessory will be appropriate for an evening dress. velvet or silk.
The color of the ribbon should fit harmoniously into the color scheme of the dress and emphasize the beauty of the hair.

Editorial Board
If you want to improve the condition of your hair, special attention should be paid to shampoos that you use.
A frightening figure - in 97% of shampoos of famous brands are substances that poison our body. The main components, due to which all the troubles on the labels are designated as sodium lauryl sulfate, sodium laureth sulfate, coco sulfate. These chemicals destroy the structure of the hair, the hair becomes brittle, lose elasticity and strength, the color fades. But the worst thing is that this stuff gets into the liver, heart, lungs, accumulates in the organs and can cause cancer.
We advise you to abandon the use of funds in which these substances are located. Recently, experts of our editorial staff conducted an analysis of sulfate-free shampoos, where the first place was taken by funds from the company Mulsan Cosmetic. The only manufacturer of all-natural cosmetics. All products are manufactured under strict quality control and certification systems.
We recommend to visit the official online store mulsan.ru. If you doubt the naturalness of your cosmetics, check the expiration date, it should not exceed one year of storage.
Entwined tail
With the help of a normal strip of fabric, you can turn the usual tail into an original hairstyle.
Tie the usual low tail with the elastic.

Take a long ribbon. Tie it around your head. in the form of a rim. If you do a haircut with a bang, then place the bandage along the line of the bang. Tie it with one or two knots under the tail.

Remove the gum from the tail, and instead, pull off the hair with two ends of the fabric crosswiseas in the photo.

Braid thus the tail along the entire length.

Tie the end of the ribbon in a beautiful bow. Done!
How to make a beautiful bundle of ordinary tail with a ribbon shown in the video.
Another interesting combination of tail and ribbons.
Spit - flower
Very interesting and unusual hairstyle. The ribbon woven into the braid makes it especially elegant and bright.
Split hair side partingas in the photo. To the left of the parting, tie a small ribbon folded in two to a small curl.
For weaving chetyrehpryadnoy braids take three strands of hair. The role of the fourth strand will be performed by the fabric (it should be the third in a row).
Perform weaving according to the following scheme: put the first strand on the third, passing it under the second. Fourth, put on the first, passing under the third. Add a small amount of hair to the extreme strands each time.
Bringing weaving to the middle of the head, tie a braid with a rubber band.

Similarly, braid a four-strand braid with a ribbon, on the right side. Weave perform diagonally. Pull the edges of the braid to create an openwork effect.
Come back to the first spit. Finish it to the end, and also stretch slightly along the edges of the curl. Lay the first braid in the shape of a flower and secure with studs.

Video will help you learn how to weave a four-strand braid of two strands and two ends of a tape.
Spit - zigzag
This original hairstyle with a ribbon, matched to the color of the eyes or dress, confidently holds hair and looks great on both little girls and adult girls.
The tape for this styling should be smooth, slippery, silk or satin. Its length should be twice the length of the hair, the width should not be very large (about 1 cm).

Comb the head of hair back. On the left side of the head, separate the small strand, flip it to the side of the face. Have the root of the hair tie a ribbon.

Take the previously laid strand. Divide it into three parts. Of these, and the tape will be a braid. Satin or silk will replace the third strand. Weaving begins on the left strand. It is transferred to the third position, passing over the second strand, and under the ribbon.

Now the right strand is skipped under the one that has become the third over the fabric.

In the following steps, weaving is performed in the same technique, but with the addition of small additional curls, as shown in the photo.

Strands need to try to weave smoothly and gently. To make a turn 2-3 times, do not interweave the strands on the left side, and then take a curl a little to the left of the braid angle, as in the photo.

Braid a section of the spit from right to left, and also make a turn.

Now you need to calculate the weaving in such a way that the strand is enough to the middle of the head. Continue to the end of the hair. Secure the result with a rubber band.

Spin the free part of the braid in a few little rings and pin to the head with pins.

If weaving a four-strand braid is new to you, use the training video.
Winding Spit
This is a very spectacular hairstyle that makes the girl unusually graceful and sophisticated. The choice of tape for her is not limited.

Prepare a satin ribbon 1 cm wide and twice the length of curls, silicone gum and hairspray for styling.
Carefully comb through the entire length. Separate the hair strand from the bang line (it will be woven first), and fasten the tape on the curl under it with a clip.

Make a full turn of the ribbon around the strand, as shown in the photo. Start and finish turnover should on the outside.

Repeat the procedure for turning around the second, left-handed strand.
Pick up the ribbon and strands and tighten them by pulling the knot. The number of waves in the curl can be arbitrary. In the photo, the girl has a not very thick hair, so four waves are used.
The last strand of the wave begins to form a curl in the opposite direction. Give it a half ring shape and tie it using the same technology.
The following strands come in alternately with the addition of a loose hair undercover.
The third and subsequent cascades are performed similarly.
It is important to remember that at each new stage, the last order of the previous one becomes the first, and is woven without additional pallets.
The end of the braid is fastened together with a tape with a silicone rubber band.
See how the master performs this hairstyle on video.
Do not worry if not all hairstyles with ribbons will work out perfectly for you the first time. Some of them will require practicing weaving skills. But, having a little practice, you will replenish the collection of your styling with interesting and unusual options.
Scythes, hair, high bun: for girls and girls
- Gather the hair in a bun, tie a thin ribbon at the base, then begin to weave the braid with it. At the end make a small bow. If you choose an accessory with taste, the hairstyle will not look childish. It is easy to experiment with scythes: make “spikelets” and original weaving.
 Very beautiful braid with ribbons
- Gathered hair. Some of the curls remain loose, and the curls around the ears are gathered back, fastened with a hairpin or barrette and decorated with an elegant ribbon.
- High beam or knot. The banal hairstyle is transformed if you tie a bun or just put a bandage over the hair.
How to decorate loose and curled curls and the usual tail
- Use the tape as a headband, put it on the forehead or along the hairline, tie bows on the side or on the crown.
 Tape instead of dressing
- Curled hair To make this hairstyle, you need to collect the hair in a low tail, wrap the ribbon and twist, fixing the hairpins.
- Normal tail. Too easy? Try to tie a low or ponytail ribbon at the base, and you will see how your image will change.
Greek hairstyle, styling the 60s and 50s for medium and short hair with headbands
In fact, this is not one, but a number of styles, which are distinguished by elegance, romance and simplicity.
 The bandage is put on over the hair, curls tucked under it, forming an elegant, delicate hairstyle that goes to absolutely everyone
- Laying from the 60s. Do a lot of hair and put a bandage on your forehead to achieve a retro effect.
- Hairstyle in the style of the 50s. Another version from the past: loose curls, gathered on the back of the head, straight bangs and a bright bandage around the head.
- For short hair. Twist and fluff curls and put a ribbon over your head - the original hairstyle is ready! Headbands are in harmony with the haircuts square, bob and others.
Beautiful wedding and evening dressing with bows
These hairstyles are suitable for evenings and weddings. The classic version is the already mentioned Greek style, while hair is recommended to curl. Twisting and intricate weaving are appropriate when the ribbon is passed between the strands.
 Add rhinestones or flowers to get a complete romantic look.
How to make a baby hairstyle
Of course, you can not ignore children's hairstyles:
- Ordinary braids. Braid one or two braids, adding satin ribbons to them.
- Corset. Very unusual hairstyle, reminiscent of ties to the dress. It is made on the basis of two French braids, in which a thin ribbon is slid crosswise through the pins.
- Non-standard weaving.
 These are pyatipryadki, and also braids from one strand and two strips of fabric, spikelets, French styling and much more.
- "Cones". On the crown, make two tails, braid each of them into a braid with ribbons, fold and fix with pins.
- Roll. Gather the hair on the back of the head, tie a ribbon to its tip, separate the ends to the sides (they should be of the same length) and fold them towards the crown. The result will be roll.
As you can see, options for packing with a huge amount of tape. Choose any and change every day!
Hair bow
Among the beautiful and light hairstyles for girls, a bow made of hair is especially popular. It can be braided even on medium-length hair.
A hairstyle with a bow is only suitable for straight hair - for curly hair, it will turn out to be sloppy.
Instruction:
- It is necessary to tie the tail and divide it into 2 parts: thick and thin.
- Thick split in half, lift the ends of the hair to the elastic band and secure the second elastic band so that the halves of the tail were on the sides.
- Free thin strand hide gum and fasten hair invisible.
Reverse inverted braid
A reverse braid or a “spin-up” braid looks like it was braided from top to bottom.
Instruction:
- It is necessary to divide the hair into 3 strands.
- Left under the middle and put on top of the right.
- Right to put on top of the middle.
- Continue to weave the braid, making sure that the outer strand is always on top of the middle one.
4-strand braid
Weaves like this:
- Hair divided into 4 equal strands and mentally numbered: 1, 2, 3, 4.
- Start weaving with 1 strand. Lead it under 2 strand.
- 4 put on top of 3.
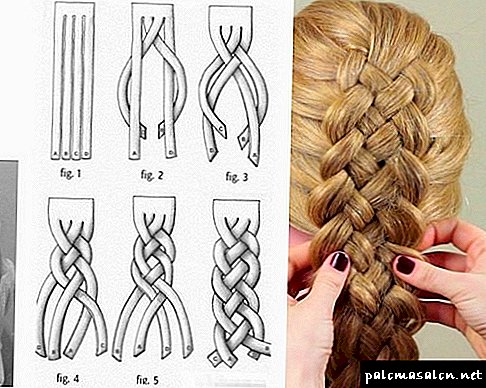
- Now 1 and 4 will be in the middle, and 2 and 3 - along the edges.
- The middle strands cross - get the first binding.
- Repeating the action, braid the braid to the end and secure with a rubber band.

Hair "Spit-tail"
It will take 2 rubber bands: wide and narrow.
Weaves like this:
- To collect hair in a high tail, using a wide elastic band.
- To braid a usual braid and fix it with a narrow elastic band.
- The wide elastic band can be replaced with a ribbon, the ends of which are tied into a bow or woven into a braid.
Weaving "Herringbone"
For weaving you need a long thin ribbon.
Instruction:
- The hair is divided into 7 equal strands. Place the tape in the middle.
- Take strand number 4 and wrap the ribbon around it.
- Take strand number 5, hold under the wrapped ribbon strand.
- Wrap the ribbon, slightly pulling up to the first braided strand.
- Similarly, wrap in turn strands number 3, 6, 2, 7 and 1, each strand tucking under the previous one.
- Strands on the left side should now be on the right, and on the right side - on the left.
- For the next binding, the rightmost strand (No. 4) with a small undercoat should be held under the three right strands and wrapped in ribbon.
- The next strand is the leftmost one (No. 5). Bind strands in the same manner as in the first binding.
- Make another 1-2 covers and secure the braid with a rubber band.
Haircut "Waterfall"
Weaving starts from the right temple and goes horizontally. 
Instruction:
- Put the left strand on the middle one, then put the right strand on the middle one. Repeat.
- The strand remaining below to release and take from the total mass of hair new.
- Make 2 bindings. Release the strand, add a new one.
- Continue until the spit reaches the left temple.
- Secure with a thin invisible rubber band.
- The remaining loose hair curl elastic curls.
Twisted tail
To create a beautiful and easy hairstyle for a girl, it is not necessary to weave braids. Different types of tails are suitable for medium hair. Reversed tail - the fastest version of the original hairstyle.
It is done like this:
- Hair to collect in a tail on a nape, to fix a thin elastic band.
- Push it down and split the hair above the rubber band into two strands.
- Thread the tail into the resulting gap, turning it inwards.
- Fasten with a wide tight elastic band so that it does not get out.
Hair "Heart"
Instruction:
- Hair divided by a vertical parting, one half to pick up a hairpin.
- On the second, comb the semicircular parting from the top to the temple.

- From the point at which the partings intersect, start weaving a French braid to the ear.
- Expand weaving and lead braid to the lowest point of the vertical parting on the back of the head. Ready braid fasten.
- Repeat the same with the other half of the hair.
- Loose hair to collect in a ponytail or to make a braid out of them.

Bundle on an elastic band
Instruction:
- Tie tail using wide fabric gum.
- Hair wrap around the gum, so that it was not visible.
- Secure with studs. No need to try to do everything carefully, such a bunch looks better when the hair is slightly disheveled.

Malvinka with a pigtail
If the hair is sparse, it is advisable to curl slightly before the hair.
Performance:
- Hair from a forehead needs to be combed back. Strongly can not be, hair should be voluminous.
- From combed hair braid braid, starting weaving at the level of the neck.
- Secure the finished braid with a thin elastic band.
Lazy spikelet
For this hairstyle you will need 10-15 thin elastic bands.
Performance:
- Comb the strands of the temples and collect them in the tail at the level of the neck, secure with a rubber band.
- Take the following 2 side strands slightly lower than the previous ones.
- Connect into a common tail, secure with a rubber band 1 cm below the first rubber band.
- Continue until all hair is collected in a ponytail.
Hair "Horns"
A funny hairstyle with two horns from braids will suit both babies and older girls. 
Run like this:
- Hair split in half and collect in two tails at the crown.
- From the tails braid braids.
- Obliquely wrap the base of the tail, forming a dense "bun".
- The tips of the hair hide under the turn of the braid and secure the design with pins.
- Repeat with another scythe.
Creating hairstyles is a fascinating process for both girls and their moms. It does not require special skills and tools. For most beautiful and light hairstyles on medium hair, only a comb and elastic are required. Weaving on average takes from 2 to 15 minutes, and its result pleases a little fashionista all day.
Video about beautiful and light hairstyles on medium hair
5 easy hairstyles for school:
Light hairstyles for medium hair: